

Installation
Taranac ships as a set of Docker images orchestrated by a small deployment bundle. You do not build anything from source: you download the bundle, run two scripts, and the installer generates every secret, pulls the images, and brings the whole stack up behind a TLS reverse proxy. This page walks through a clean install on a single host and the first things you do afterwards.
The bundle contains only configuration — a Docker Compose file, an installer, a
taranac operations wrapper, and a config/ directory you drop your TLS
certificate and (optionally) Firebase key into. The application itself arrives as
images pulled at install time.
There is no source checkout and no private registry anywhere in this: the images
come from the public ghcr.io/taranaclabs/taranac, the bundle from the public
TaranacLabs/taranac repository, and both ship under the
Elastic License 2.0.
There is no separate “Pro” build either — one set of images and one bundle serve
every installation, high availability included; Pro is a license you upload later,
not a different download.
- $ tar xf taranac-bundle.tar.gz
- $ sudo bash bootstrap.sh
- $ ./install.sh secrets · pull images
Prerequisites
Section titled “Prerequisites”| Requirement | Minimum |
|---|---|
| OS | Ubuntu 22.04 / 24.04 / 26.04 LTS (any modern Linux with systemd works) |
| CPU | 4 cores |
| RAM | 6 GB |
| Disk | 20 GB free |
| Access | a non-root user with sudo |
| Software | Docker Engine + the Docker Compose plugin, and openssl (plus curl and tar, which ./taranac update uses later) |
You also need the hostname or IP clients will use to reach Taranac. Pick the primary one before you start — the installer asks for it, and it becomes the name in links, in the printed URL and in the certificate’s subject. It does not have to be the only address the node answers on: adding the others is a post-install setting (see Answering on more than one address), not a question you have to get right before the product has ever run.
Network ports
Section titled “Network ports”Open inbound only the ports for the protocols you actually use. The admin UI and API are always reached through port 443.
| Port | Protocol | Used for |
|---|---|---|
443 / 80 | TCP | Admin UI and API (80 redirects to 443) |
49 | TCP | TACACS+ (device administration) |
6049 | TCP | TACACS+ over TLS |
1812 / 1813 | UDP | RADIUS authentication / accounting (AAA) |
1814 / 1815 | UDP | NAC 802.1X authentication / accounting |
3799 | UDP | RADIUS Change of Authorization (CoA) |
8080 / 8444 | TCP | Captive portal (guest / onboarding), HTTP and HTTPS |
8443 | TCP | MFA push service — where phones reach push registration, unless you front it on 443 with TARANAC_MFA_DOMAIN |
Every one of those is the host-side default and is overridable in .env
(TACACS_PORT, RADIUS_AUTH_PORT, MFA_PORT, CAPTIVE_PORTAL_HTTPS_PORT, …);
the containers always listen on the standard port inside the network.
Outbound HTTPS is needed to pull the container images (and, periodically, the IEEE OUI database used to identify endpoint vendors).
What gets deployed
Section titled “What gets deployed”Taranac is a multi-container stack on one shared PostgreSQL database. A single public edge reverse proxy terminates TLS and is the only browser-facing service; everything else talks over an internal Docker network.
| Service | Role |
|---|---|
edge | Public TLS reverse proxy — the certificate browsers see |
frontend | React admin UI (internal, behind the edge) |
api | FastAPI control plane; generates the daemon configs |
taranac-mfa | Push / TOTP multi-factor authentication service |
tacacs | TACACS+ daemon (device administration) |
radius | RADIUS daemon (AAA) |
nac | RADIUS daemon for 802.1X port access control |
captive-portal | Guest / onboarding portal |
taranac-renderer | HTML→PDF for report exports (internal only, no published port) |
winbind | The Active Directory machine account MS-CHAPv2 needs — inert until a domain is configured, so it is safe on every install |
postgres | PostgreSQL 16 database |
The api container is the brain: when you change policy in the UI it regenerates
the TACACS+, RADIUS, NAC, and captive-portal configuration, writes it to shared
volumes, and signals the daemons to reload — no restarts, no hand-edited config
files. The protocol daemons run in separate containers so a fault in one engine
cannot take down the others.
All services run with restart: unless-stopped and Docker is enabled on boot, so
the whole stack comes back automatically after a reboot.
Step 1 — Get the bundle
Section titled “Step 1 — Get the bundle”Download and unpack the latest release. There’s no version to pick — latest
always resolves to the newest bundle — and the archive expands into its own
taranac/ directory:
curl -fsSL -O https://github.com/TaranacLabs/taranac/releases/latest/download/taranac-bundle.tar.gztar xf taranac-bundle.tar.gzcd taranacPrefer to track the bundle scripts with git instead? git clone https://github.com/TaranacLabs/taranac.git && cd taranac gives you the same
deployment files (the clone contains no product source — the app still arrives as
images pulled at install time).
The bundle is a flat archive of deployment files — the install.sh and
bootstrap.sh scripts, the taranac operations wrapper, docker-compose.yml
and the config/ templates. All releases are published on the
project releases page.
Step 2 — Install Docker (if needed)
Section titled “Step 2 — Install Docker (if needed)”If the host already has Docker Engine and the Compose plugin, skip this. Otherwise the bundle ships a bootstrap script:
sudo bash bootstrap.shIt installs Docker, the Compose plugin, enables the engine on boot, and adds your
user to the docker group.
Step 3 — Run the installer
Section titled “Step 3 — Run the installer”./install.shThe installer asks just three questions (press Enter for the default in brackets):
| Prompt | Default | Notes |
|---|---|---|
| Primary domain | taranac.example.com | Hostname/IP for the admin UI; becomes the certificate’s subject and the printed URL |
| Initial admin username | admin | The first web-admin account |
| Initial admin email | admin@<domain> |
It used to ask a fourth — the other addresses the certificate should cover — and since 1.2.3 it does not. Nothing at install time depended on the answer: the certificate generated here is self-signed whatever addresses it carries. Widening it is a post-install setting, below.
All three answers can be pre-seeded through the environment for an unattended
install — TARANAC_DOMAIN, INITIAL_ADMIN_USERNAME, INITIAL_ADMIN_EMAIL. That
is how the appliance’s first-boot wizard drives the same installer.
Everything else is a bundle property, not an operator choice: the image
registry (ghcr.io/taranaclabs/taranac) and the version tag are fixed by the
release you downloaded — the tag is read from the bundle’s VERSION file, so the
installer never asks for it and the images can’t drift from the bundle. If you
mirror the images (air-gapped installs) or want to pin the MFA push to its own
hostname, pass them as environment variables instead of answering a prompt:
IMAGE_PREFIX=registry.local/taranac TARANAC_MFA_DOMAIN=mfa.example.com ./install.shWith no MFA push domain set, push registration defaults to https://<primary domain>:8443/ttype/push. Set one and the edge fronts the push service on 443
for that hostname instead. SKIP_PULL=1 is the other useful override: it uses
images already loaded on the host rather than pulling any.
The installer then generates every secret for you — the PostgreSQL password, the JWT
signing key (SECRET_KEY), the encryption master key (MASTER_KEY), the internal
API keys, the replication and Patroni credentials a later HA conversion will need,
and a strong admin password — writes them to a .env file, pulls the images, and
starts the stack.
When it finishes it prints the admin login: URL, username, and the generated
password. (It is also in .env as INITIAL_ADMIN_PASSWORD if you miss it.)
Why .env is group-readable
Section titled “Why .env is group-readable”.env is written 0640 and given group 999 — the gid the api container runs
as — and config/tls, config/firebase and config/etcd-ca get the same grant.
That one grant is what makes a backup complete: the api reads those files
through a read-only mount to put them in the archive, and nothing inside the
container can widen a host file it cannot read. Before 1.2.3 the file was left
0600 and owned by the operator, and every backup failed outright.
Changing a file’s group needs root, so on a non-root install the script may ask
for your sudo password once, saying why first. It is genuinely once:
./taranac update preserves the grant on every later run — and repairs it on an
older installation that has never re-run install.sh.
The master key, in brief
Section titled “The master key, in brief”The master key (a Fernet key) is the root of all secret encryption. The installer
puts it in .env as MASTER_KEY with MASTER_KEY_SOURCE=env, which is the
simplest model: the key lives in the environment file and is loaded at start.
Without it the API still starts but runs sealed — any operation touching an
encrypted field fails until the key is supplied. Treat .env as a sensitive
credential and store a copy somewhere safe and offline — backup archives are
encrypted with this key, so a copy that lives only on the host you are protecting
is not a copy. Never edit the value by hand; ./taranac rotate-key is the
supported way to change it deliberately, and it keeps the retired key so older
archives stay restorable.
Step 4 — First login
Section titled “Step 4 — First login”Open https://<your-domain>/ and sign in with the printed admin credentials.
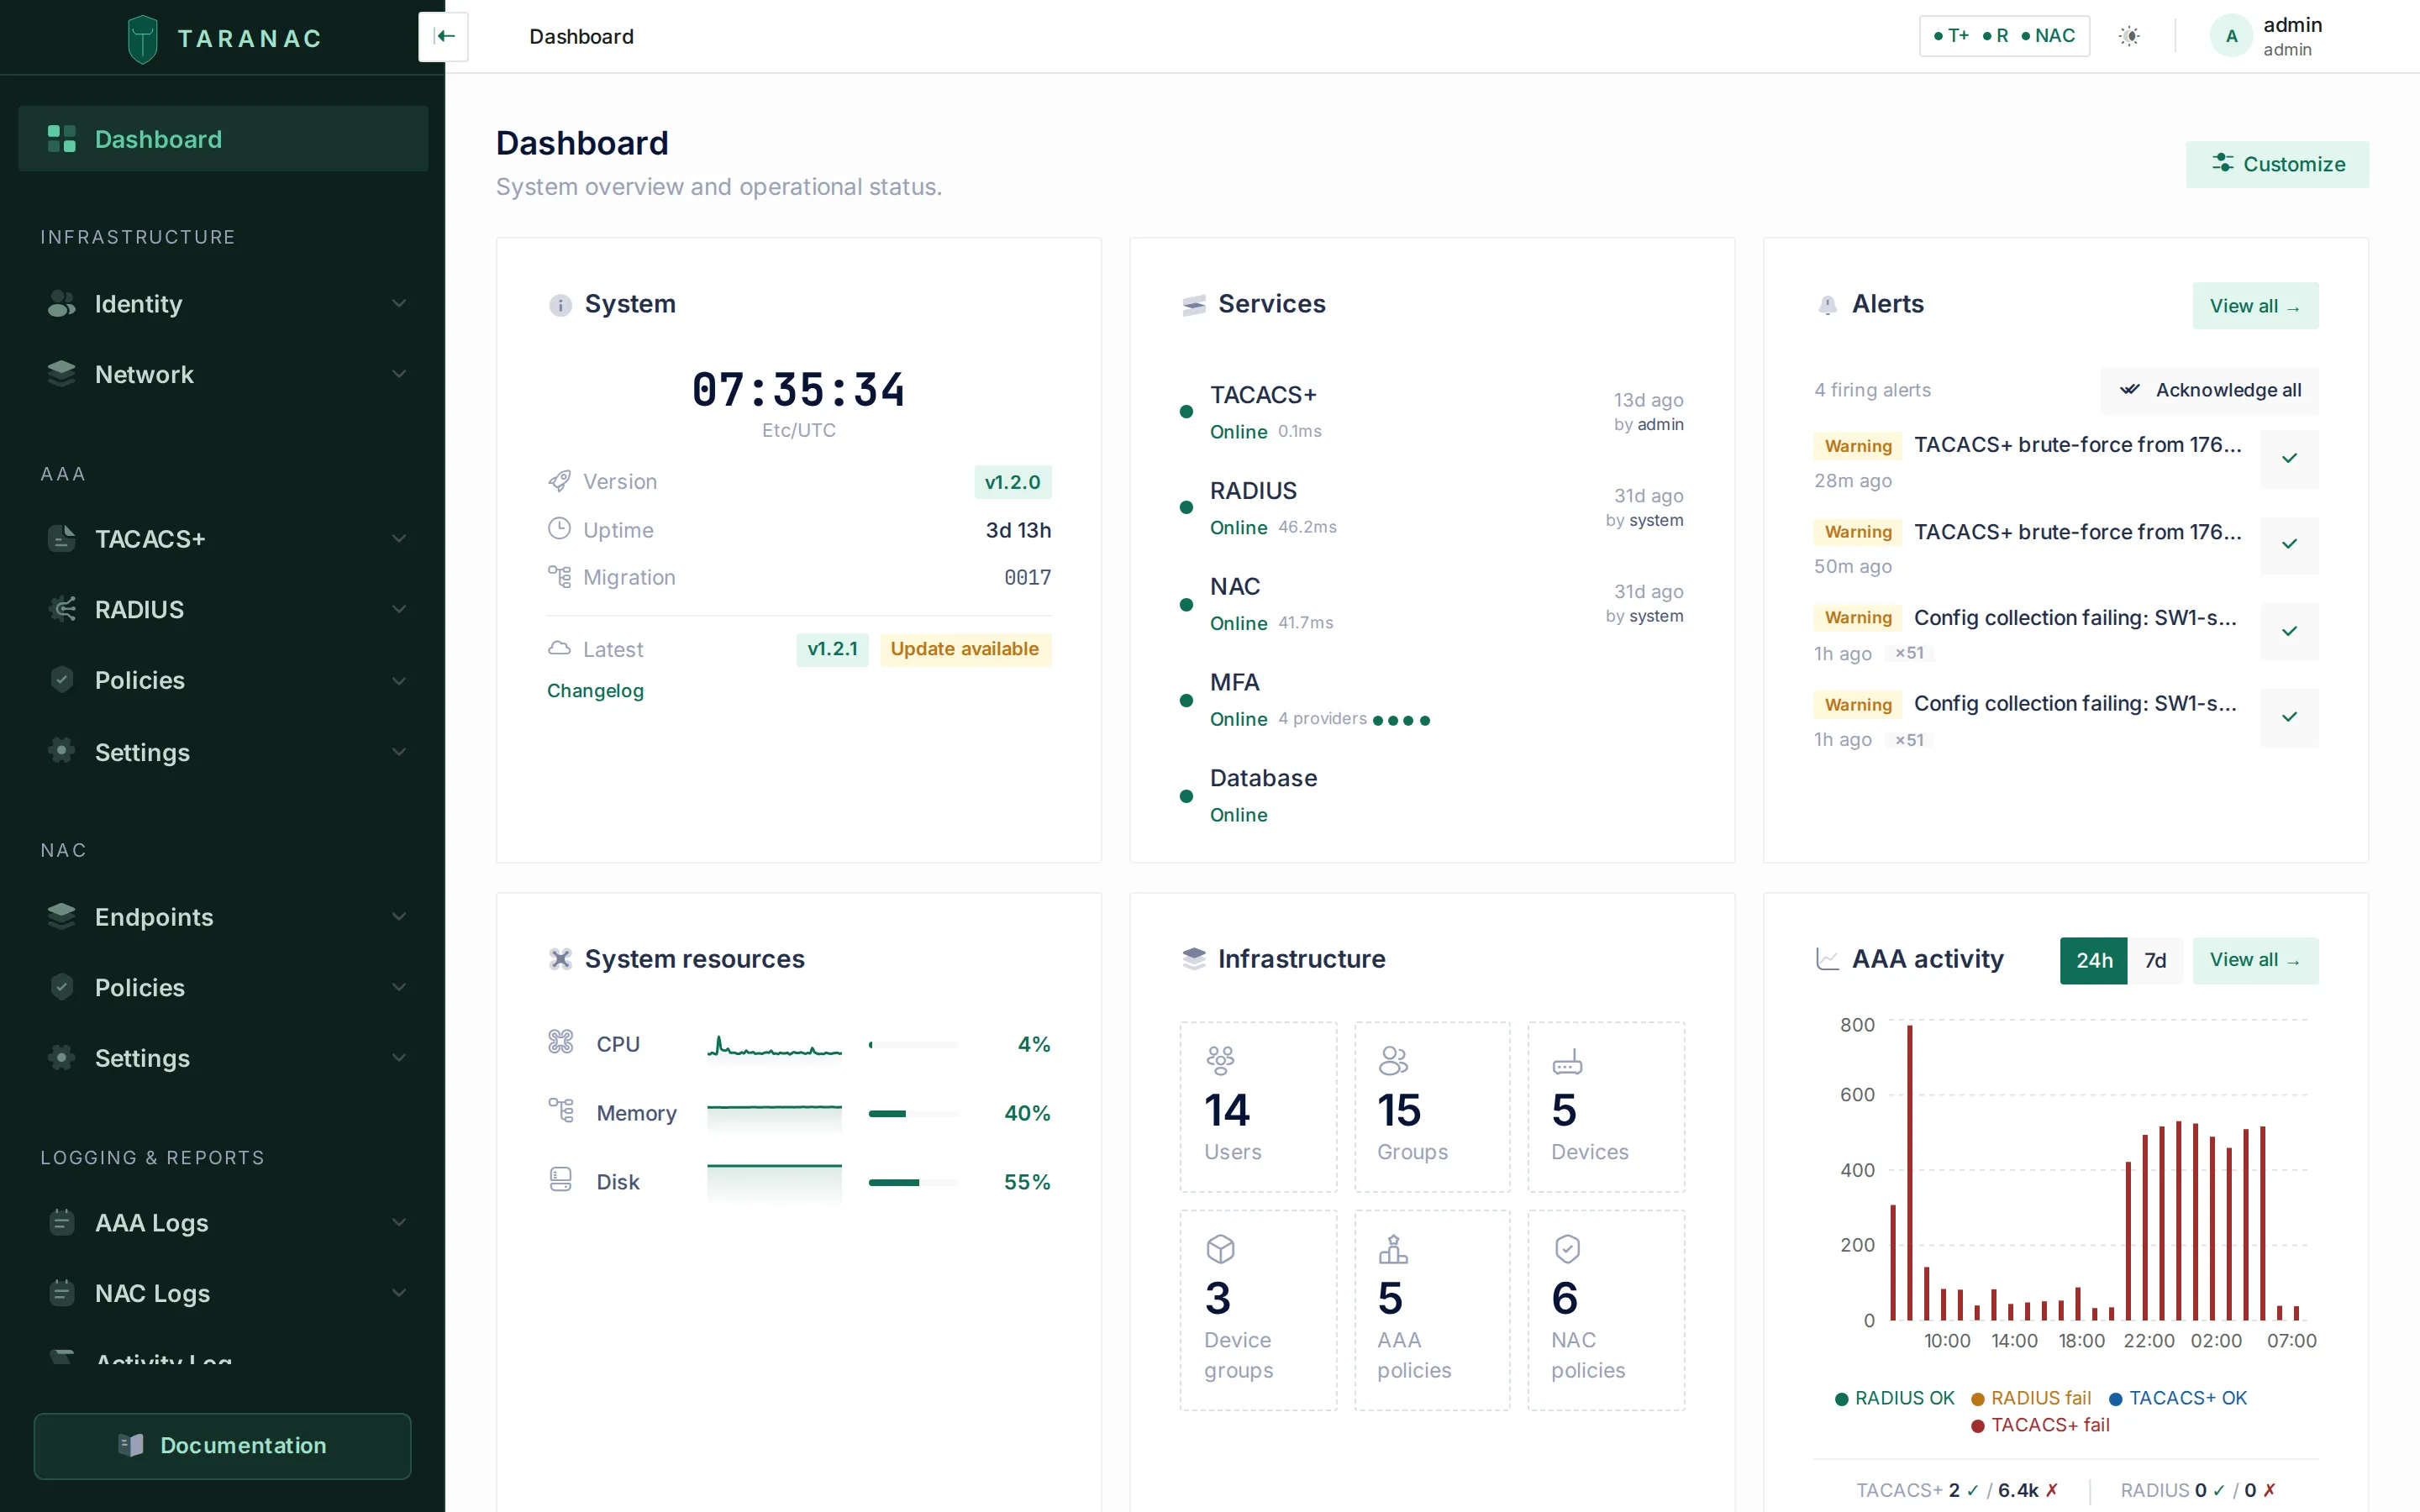 The dashboard is the landing page once you are authenticated.
Until you install a trusted certificate (next step), the edge serves a temporary self-signed certificate, so the browser shows a security warning — that is expected on a fresh install. Change the admin password right after logging in.
Step 5 — Install your TLS certificate
Section titled “Step 5 — Install your TLS certificate”Taranac does not automate Let’s Encrypt — you bring your own certificate
(commercial CA, your organization’s internal CA, or a manually issued one). Drop
two files into config/tls/, using exactly these names:
| File | Contents |
|---|---|
tls.crt | Full chain — your server certificate followed by any intermediates |
tls.key | The matching private key (unencrypted PEM) |
The certificate’s Subject Alternative Name must cover your primary domain, every
address listed in TARANAC_EXTRA_ADDRESSES, and the MFA push domain if you set
one — with any IP address present as an IP: SAN, not DNS:. Then apply it
without rebuilding anything:
./taranac restart edgeReload the page and the warning is gone. If files are absent the edge keeps
serving its self-signed certificate, so the stack always boots either way. At
startup the edge names in its log every address your certificate does not cover,
so ./taranac logs edge is the check that it landed.
That self-signed fallback lives in a Docker volume, not the container’s writable
layer: it is minted once and reused, and regenerated only when it is missing,
within 30 days of expiring, or no longer covering this node’s addresses. Restarts
and upgrades leave it alone — which is what keeps a standalone collector or a DMZ
captive portal that pinned it working, instead of needing a re-pin at every
remote site after a routine restart edge.
Answering on more than one address
Section titled “Answering on more than one address”The primary domain is rarely the only way in: staff open a DNS name while a remote
collector or a DMZ captive portal dials this node’s IP, and both have to work
without picking a winner. List the rest in .env — names and IPs, comma-separated:
TARANAC_EXTRA_ADDRESSES=taranac.corp.example,10.20.0.10They widen both the certificate’s SAN and the edge’s nginx server_name; the
primary stays the one used for links and the printed URL. An IP goes into the
certificate as an IP: SAN rather than a DNS: one — a distinction a browser
merely warns about, while a collector or DMZ portal refuses the connection
outright. That failure surfaces at the remote site with nothing pointing back
here, which is why it is worth getting right the first time.
Apply it by recreating the edge:
./taranac up -d edgeNot ./taranac restart edge: a restart reuses the container it already has, with
the environment it was created with, so a value you just added to .env would
never be read. (Certificate files are different — those are read from a mount at
every start, so a plain restart is enough for them.) Recreating also re-mints the
self-signed certificate to cover the new address, so any module that pinned the old
one has to be re-pinned.
Step 6 — Enable MFA push (optional)
Section titled “Step 6 — Enable MFA push (optional)”Out of the box, MFA works in free poll-only mode — the app checks for pending
approvals periodically. To enable instant push notifications, drop your Firebase
service-account JSON at config/firebase/firebase-credentials.json, then:
./taranac up -d taranac-mfaScaling to high availability (optional, Pro)
Section titled “Scaling to high availability (optional, Pro)”A single host is the default and the right choice for most deployments. If you later need authentication to survive the loss of a node, the same bundle converts into a multi-node high-availability cluster — Patroni-managed PostgreSQL streaming replication with automatic failover. Since 1.2.3 that is three commands rather than a runbook:
./taranac cluster init # declare the cluster./taranac cluster add-witness --address <addr> # the etcd arbiter — REQUIRED first./taranac cluster add-node --address <addr> # once per additional nodeEach prints the single command to run on the machine being added. A witness — an etcd arbiter on a third host — is required, not optional. HA is a Pro feature, unlocked by a license that also sets how many nodes you may run; it is the same images and the same bundle, so nothing about this install has to change now. Start single-host and convert when required.
See High availability for the architecture, prerequisites and the step-by-step conversion, and Licensing for enabling the Pro feature.
Day-to-day operations
Section titled “Day-to-day operations”Use the taranac wrapper from the bundle directory — a shortcut for the full
docker compose --env-file .env -f docker-compose.yml … invocation, so any Compose
subcommand works too. It is a little more than a shortcut now: it resolves what
kind of host it is on (a product node, an HA witness, a standalone NCM collector)
and drives that host’s compose file, merging the Patroni overlay on a converted
node. Every subcommand is catalogued in the CLI reference.
./taranac ps # service status./taranac logs -f api # follow a service's logs./taranac restart edge # restart one service (e.g. to apply a new cert)./taranac down # stop everything (data is preserved in volumes)./taranac up -d # start againRecovering admin access
Section titled “Recovering admin access”After MAX_LOGIN_ATTEMPTS failed logins (5 by default) an account is locked. The
lock does not auto-expire, so a locked-out admin cannot recover through the web
UI — common on an internet-facing host once someone starts guessing passwords.
Recover from the server console:
./taranac unlock # list locked accounts./taranac unlock admin # unlock one account./taranac unlock --all # unlock every locked account./taranac reset-password admin # reset a forgotten password (prints a new one)./taranac create-admin # create-or-repair an admin login when none worksUpgrading
Section titled “Upgrading”Re-running the installer is itself an upgrade path: when .env already exists,
install.sh never regenerates secrets — it backfills any secret a newer bundle
introduced, repairs the .env and config/ permissions, pulls newer images and
restarts. The taranac wrapper adds a self-maintaining update that refreshes both
the images and the bundle files (wrapper, Compose files, installer, docs):
./taranac version # installed version + check for a newer one./taranac update # update to the latest (or: --version <X>)update leaves your .env and config/ untouched, bumps the pinned version and
recreates the stack; database migrations run automatically when api starts.
Three things it does on the way past that are worth knowing:
- It lists the settings this release added, as a notice rather than a warning — their defaults already apply, so there is nothing to do.
- It reclaims disk. Once the stack is back up, superseded images are removed,
keeping the version just installed and the one before it as a rollback target.
--keep-imagesopts out. Before 1.2.6 every superseded image stayed forever. - On a cluster, replicas first and the primary last. The primary refuses an out-of-order update rather than half-applying it.
Take a backup before upgrading — Backups & upgrades covers the whole update model, every flag, and the restore path.
When to use what
Section titled “When to use what”| You want to… | Do this |
|---|---|
| Install on a fresh host | bootstrap.sh (if no Docker) → install.sh |
| Apply a new TLS certificate | Drop files in config/tls/, then ./taranac restart edge |
| Answer on another name or IP | Add it to TARANAC_EXTRA_ADDRESSES in .env, then ./taranac up -d edge |
| Move to a newer version | ./taranac update (or re-run ./install.sh) |
| Convert to an HA cluster | ./taranac cluster init → add-witness → add-node |
| Stop / start the stack | ./taranac down / ./taranac up -d |
| Recover a locked or forgotten admin | ./taranac unlock / ./taranac reset-password |
| Run a single protocol only | Open just that protocol’s inbound ports; the daemons still all start |
Troubleshooting
Section titled “Troubleshooting”- A service shows
unhealthyin./taranac ps— read its logs:./taranac logs --tail=100 <service>. - Browser still warns after Step 5 — confirm
config/tls/tls.crtis the full chain and its SAN matches your domain, then./taranac restart edge. The edge logs every address the certificate misses:./taranac logs edge. - A new
TARANAC_EXTRA_ADDRESSESvalue had no effect — you restarted the edge instead of recreating it../taranac up -d edge. - A collector or DMZ portal refuses to connect while a browser only warns —
the address is in the certificate as a
DNS:entry and needs to be anIP:one. See Answering on more than one address. docker psneedssudo— you didn’t start a new login shell afterbootstrap.sh; log out/in or runnewgrp docker.
Related
Section titled “Related”- Quick start — first policies after install
- Introduction — what Taranac is and where it fits
- Architecture — the containers and how a request flows
- CLI reference — every
./taranacsubcommand and flag - Backups & upgrades — the update model and disaster recovery
- High availability — converting a single host into an HA cluster
- Licensing — Community vs Pro, and activating an HA license
- Project repository — releases and the deployment bundle