

Quick start
This walkthrough assumes the platform is already up (see Installation). In about fifteen minutes you will log in as the initial administrator, get oriented with the objects Taranac ships pre-populated, register your first network device, authorize one login, and watch that authentication land in the log.
Taranac is administered entirely through its web admin UI — a single-page application the browser reaches over HTTPS on the edge reverse proxy (ports 80/443). The frontend container renders the SPA internally and publishes no port of its own. There is no separate CLI for day-to-day work; everything below is done in the browser.
- Log in initial admin → Dashboard
- Get oriented seeded baseline deny all
- Register device core-sw-01 enabled
- Authenticate policy tester → Log
1. Log in as the initial administrator
Section titled “1. Log in as the initial administrator”On first start the backend seeds exactly one account if the user table is empty: the initial admin. Its credentials come from the .env values written during install:
| Setting | Default | Notes |
|---|---|---|
INITIAL_ADMIN_USERNAME | admin | The login name. install.sh prompts for it. |
INITIAL_ADMIN_EMAIL | admin@<your-domain> | Used for notifications and password reset. |
INITIAL_ADMIN_PASSWORD | (generated) | install.sh always generates a strong one, prints it on the completion screen and writes it into .env. Only if you hand-write .env and leave this empty does the backend generate one itself and log it once. |
INITIAL_ADMIN_GROUP_NAME | Administrators | The group the account is placed in, created with is_admins set and MFA off. |
Open https://<your-domain>/ and sign in. If you walked away from the installer’s completion screen, read the password back from the bundle directory — and if it has already been changed and lost, reset it from the console:
grep '^INITIAL_ADMIN_PASSWORD=' .env # what the installer generated./taranac reset-password admin # forgotten, or already changed./taranac unlock admin # locked out by failed attemptsAfter login you land on the Dashboard (/dashboard) — the landing route for every authenticated session, and never permission-gated. An account without the dashboard:view permission still lands there and gets a welcome splash instead of the widgets.
2. Get oriented: what ships pre-populated
Section titled “2. Get oriented: what ships pre-populated”Taranac is usable out of the box because the backend seeds a working baseline on first start. These objects are visible and editable in the admin UI from the moment you log in. Knowing they exist saves you from rebuilding things by hand.
| Area | Seeded objects | Where in the UI |
|---|---|---|
| RBAC roles | operator (create/edit, no delete), auditor (read-only + audit export) and demo (read-only) — not system roles: you may edit or delete them | Infrastructure → Identity → RBAC |
| TACACS+ profiles | 4 shell profiles: General Full Access (priv 15), General Read-Only (priv 1), and Cisco NX-OS Network Admin / Network Operator | AAA → TACACS+ → Profiles |
| TACACS+ command sets | One: read-only — permit show, ping, traceroute, exit, deny the rest | AAA → TACACS+ → Command Sets |
| RADIUS profiles | 13 device-administration profiles across Cisco IOS/NX-OS, Juniper, FortiGate, Palo Alto, HPE/Aruba and Huawei | AAA → RADIUS → Profiles |
| Device templates | 18 TACACS+ vendor templates and 15 RADIUS ones — the attribute shapes profiles are built from | AAA → TACACS+ → Templates · AAA → RADIUS → Templates |
| AAA policy | One default catch-all rule (order=9999, deny all) that cannot be deleted or moved | AAA → Policies → Policy Table |
| NAC endpoint groups | 9 groups — system Unclassified and Blocked, plus Corporate Devices, BYOD, Printers, IP Phones, IoT/Sensors, Security Cameras, Guest Devices — with 11 classification rules by vendor | NAC → Endpoints → Endpoint Groups |
| NAC authorization profiles | Corp-Default (VLAN 100), MAB-Default (VLAN 300), Guest-Net (VLAN 200), Guest-Redirect (VLAN 999 + URL redirect) | NAC → Policies → Authorization Profiles |
| NAC policy | 3 rules: 802.1X known users → Corp-Default, MAB known endpoints → MAB-Default, and a default Reject | NAC → Policies → Policy Table |
| Captive portal | One default portal, slug guest, embedded, with a self-service Guest Access flow | NAC → Endpoints → Captive Portals |
| OUI / vendor data | ~39,000 IEEE OUI prefixes (downloaded from IEEE on first start, falling back to the bundled snapshot) and the built-in NAC vendor dictionary | NAC → Settings → OUI Database · NAC → Policies → Vendor Dictionary |
| Reporting | 33 report datasets and 4 ready-made reports over them | Logging & Reports → Reporting |
The default AAA policy denies everything, and the default NAC policy rejects everything not matched by a more specific rule. This is deliberate: nothing is authorized until you say so. Your job in the next steps is to add a device and one permit path.
3. Read the dashboard
Section titled “3. Read the dashboard”The dashboard is a widget canvas, not a fixed overview. It is where you confirm that traffic is flowing and services are healthy — and you can rearrange it to say what you care about.
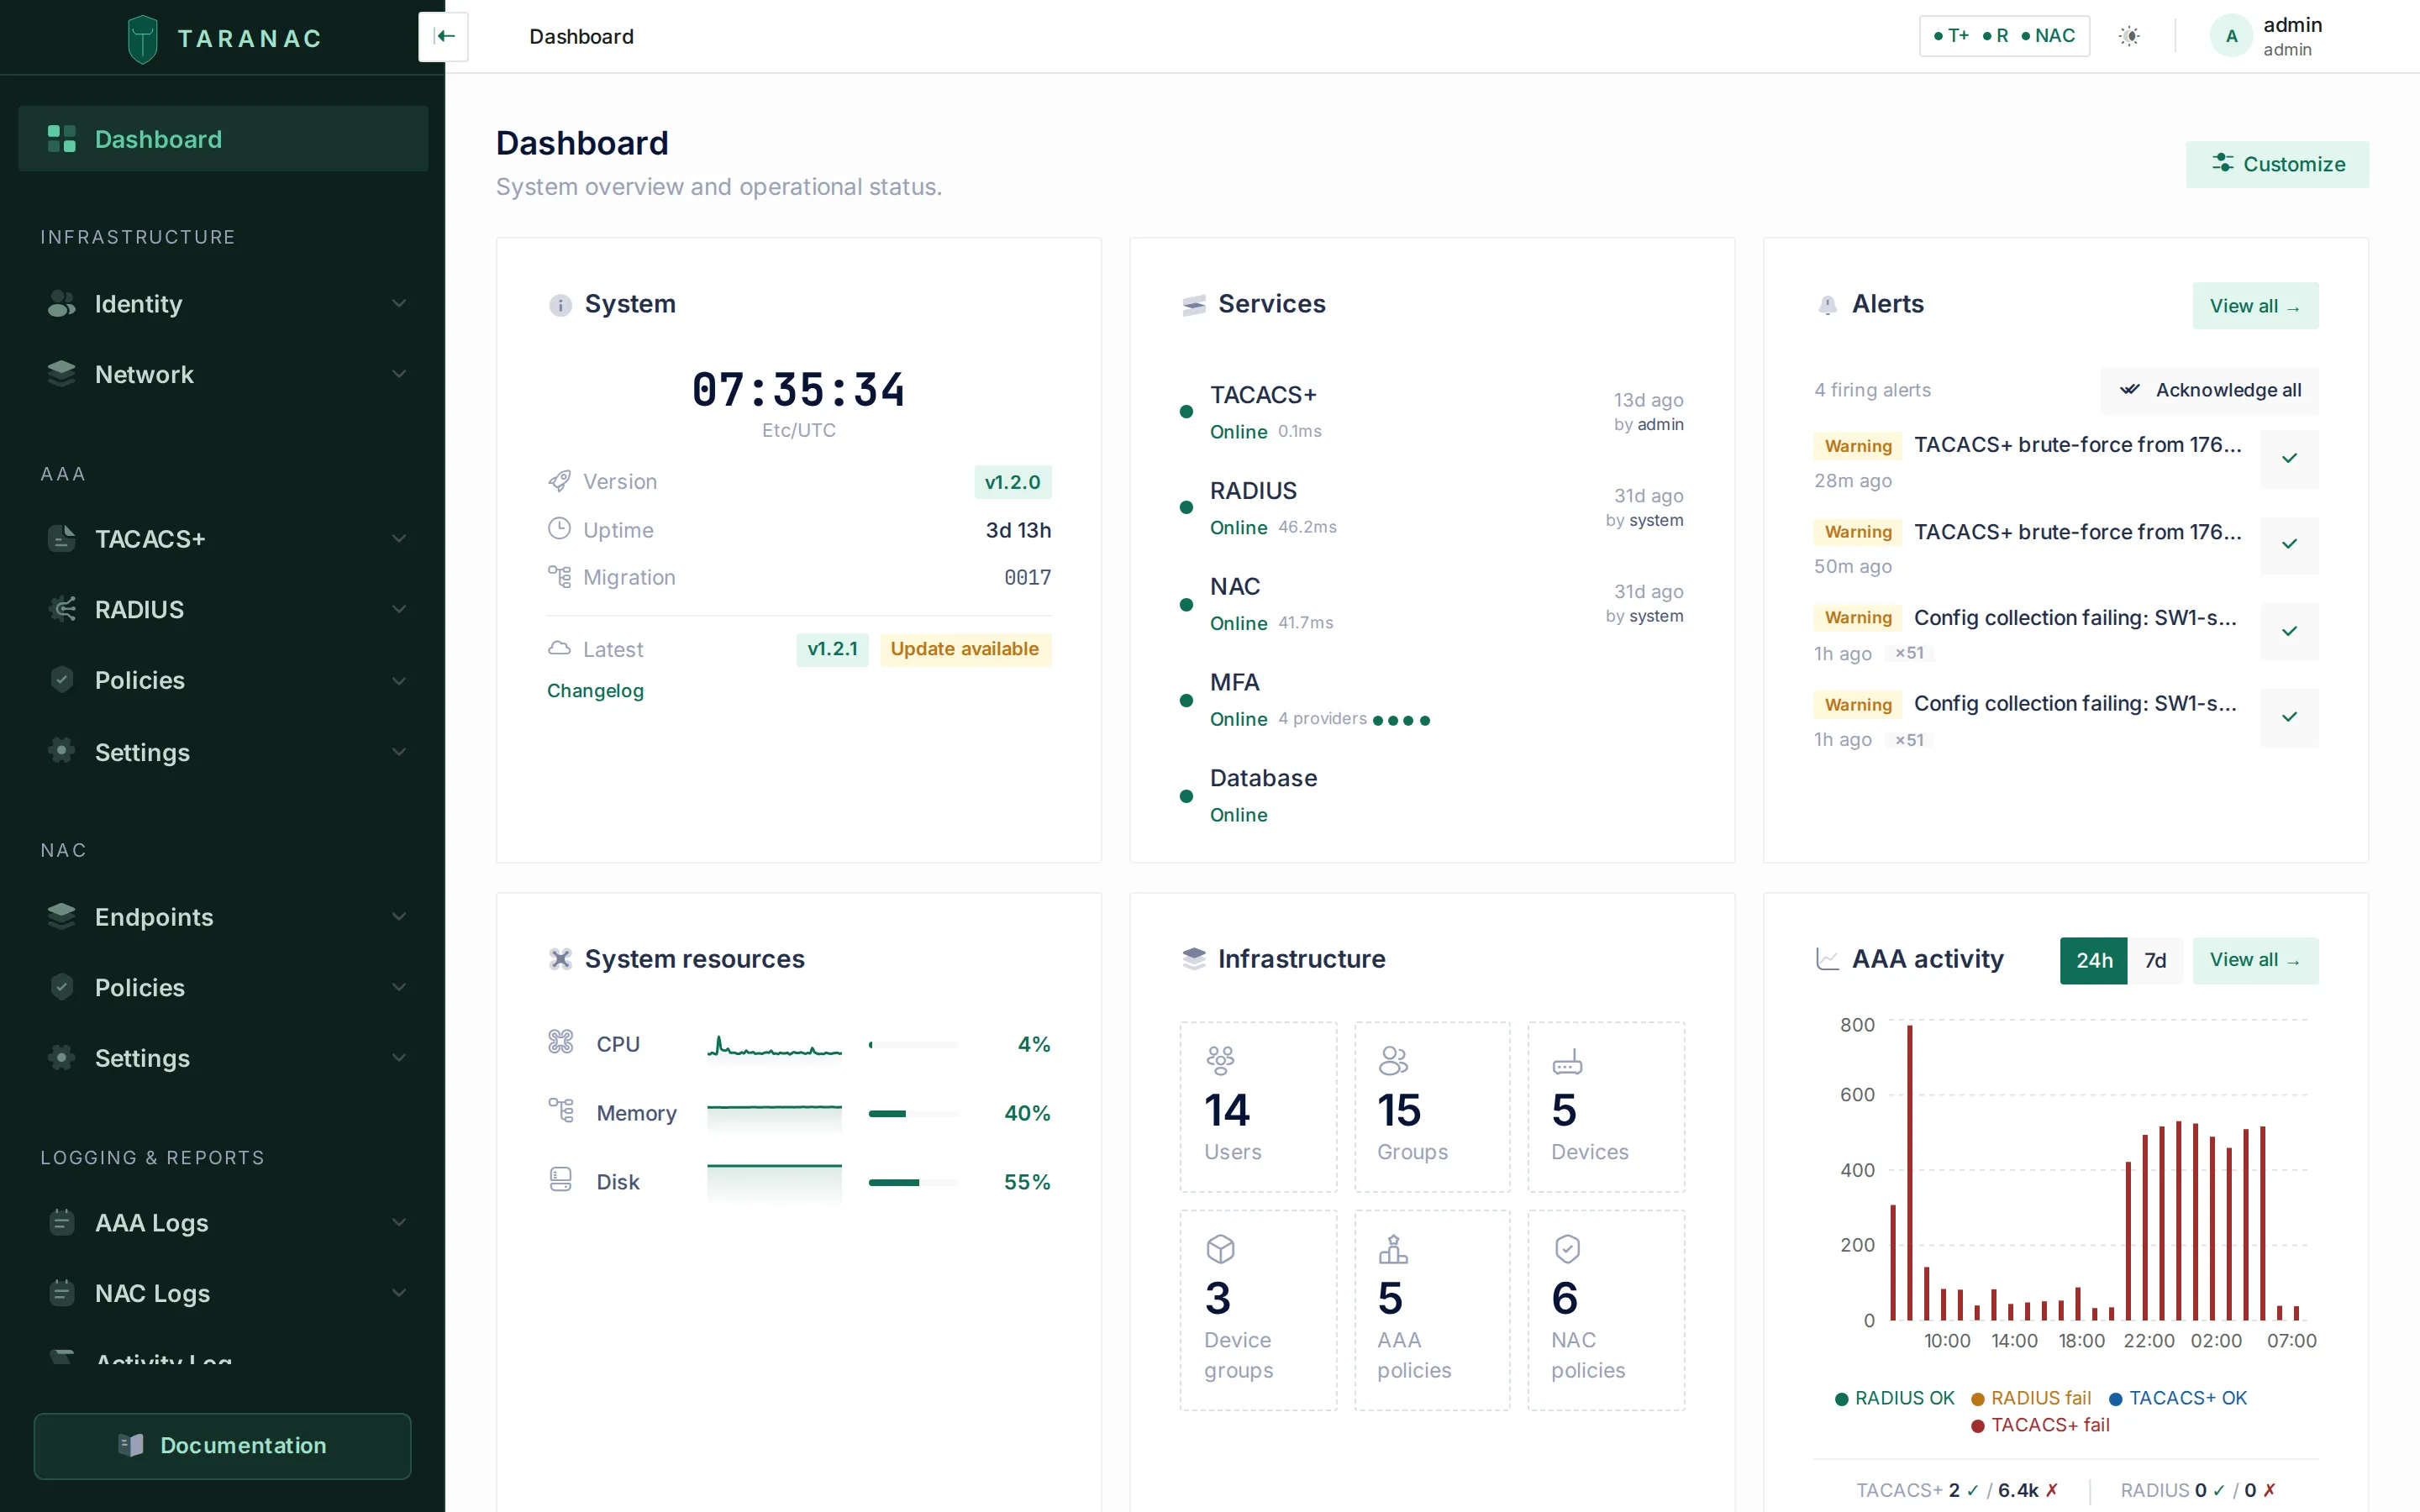 The dashboard: system and service health, the alert queue, resource meters, infrastructure counts and AAA activity — every card a widget you can move, resize or hide.
There are 21 widgets in the catalogue and all of them are on by default, each at the narrow (S) width, so the first thing you see is a uniform compact grid. Press Customize in the page header to enter edit mode: drag a card by its handle to reorder, click its width button to cycle S → M → L, hide the ones you do not want, re-show them from the Hidden widgets tray, then Save. The layout is stored per user (with Reset to default to start over), and a widget you have no permission for is dropped from the canvas entirely rather than shown empty.
The ones you will lean on first:
| Widget | What it tells you |
|---|---|
| System | Version, uptime, migration revision, and an update check against taranac.pro with a link to the changelog. |
| Services | TACACS+, RADIUS, NAC, MFA and the database, each with a reachability dot (green = online, red = unreachable/error), response time, who last deployed the config and when, plus a pending changes badge. |
| Alerts | Firing system alerts by severity, with inline acknowledge and Acknowledge all. |
| System resources | CPU, memory and disk, each with a sparkline and a bar. |
| Infrastructure | Live counts of users, groups, devices, device groups, AAA policies and NAC policies. Each tile is clickable and opens its list page — when your role may view it. |
| AAA activity | Stacked bar chart of TACACS+ and RADIUS successes/failures, toggleable between 24h and 7d. |
| Top failed auth (24h) | The users and devices with the most failures — your first stop when something is being rejected. |
4. Register your first network device
Section titled “4. Register your first network device”A device in Taranac is one network access server — a switch, router, firewall, VPN concentrator, or access point — that sends TACACS+ or RADIUS requests. The device record holds the shared secret(s) the daemon uses and declares which protocols it speaks. Until a device exists with a matching IP and secret, the daemons reject its requests.
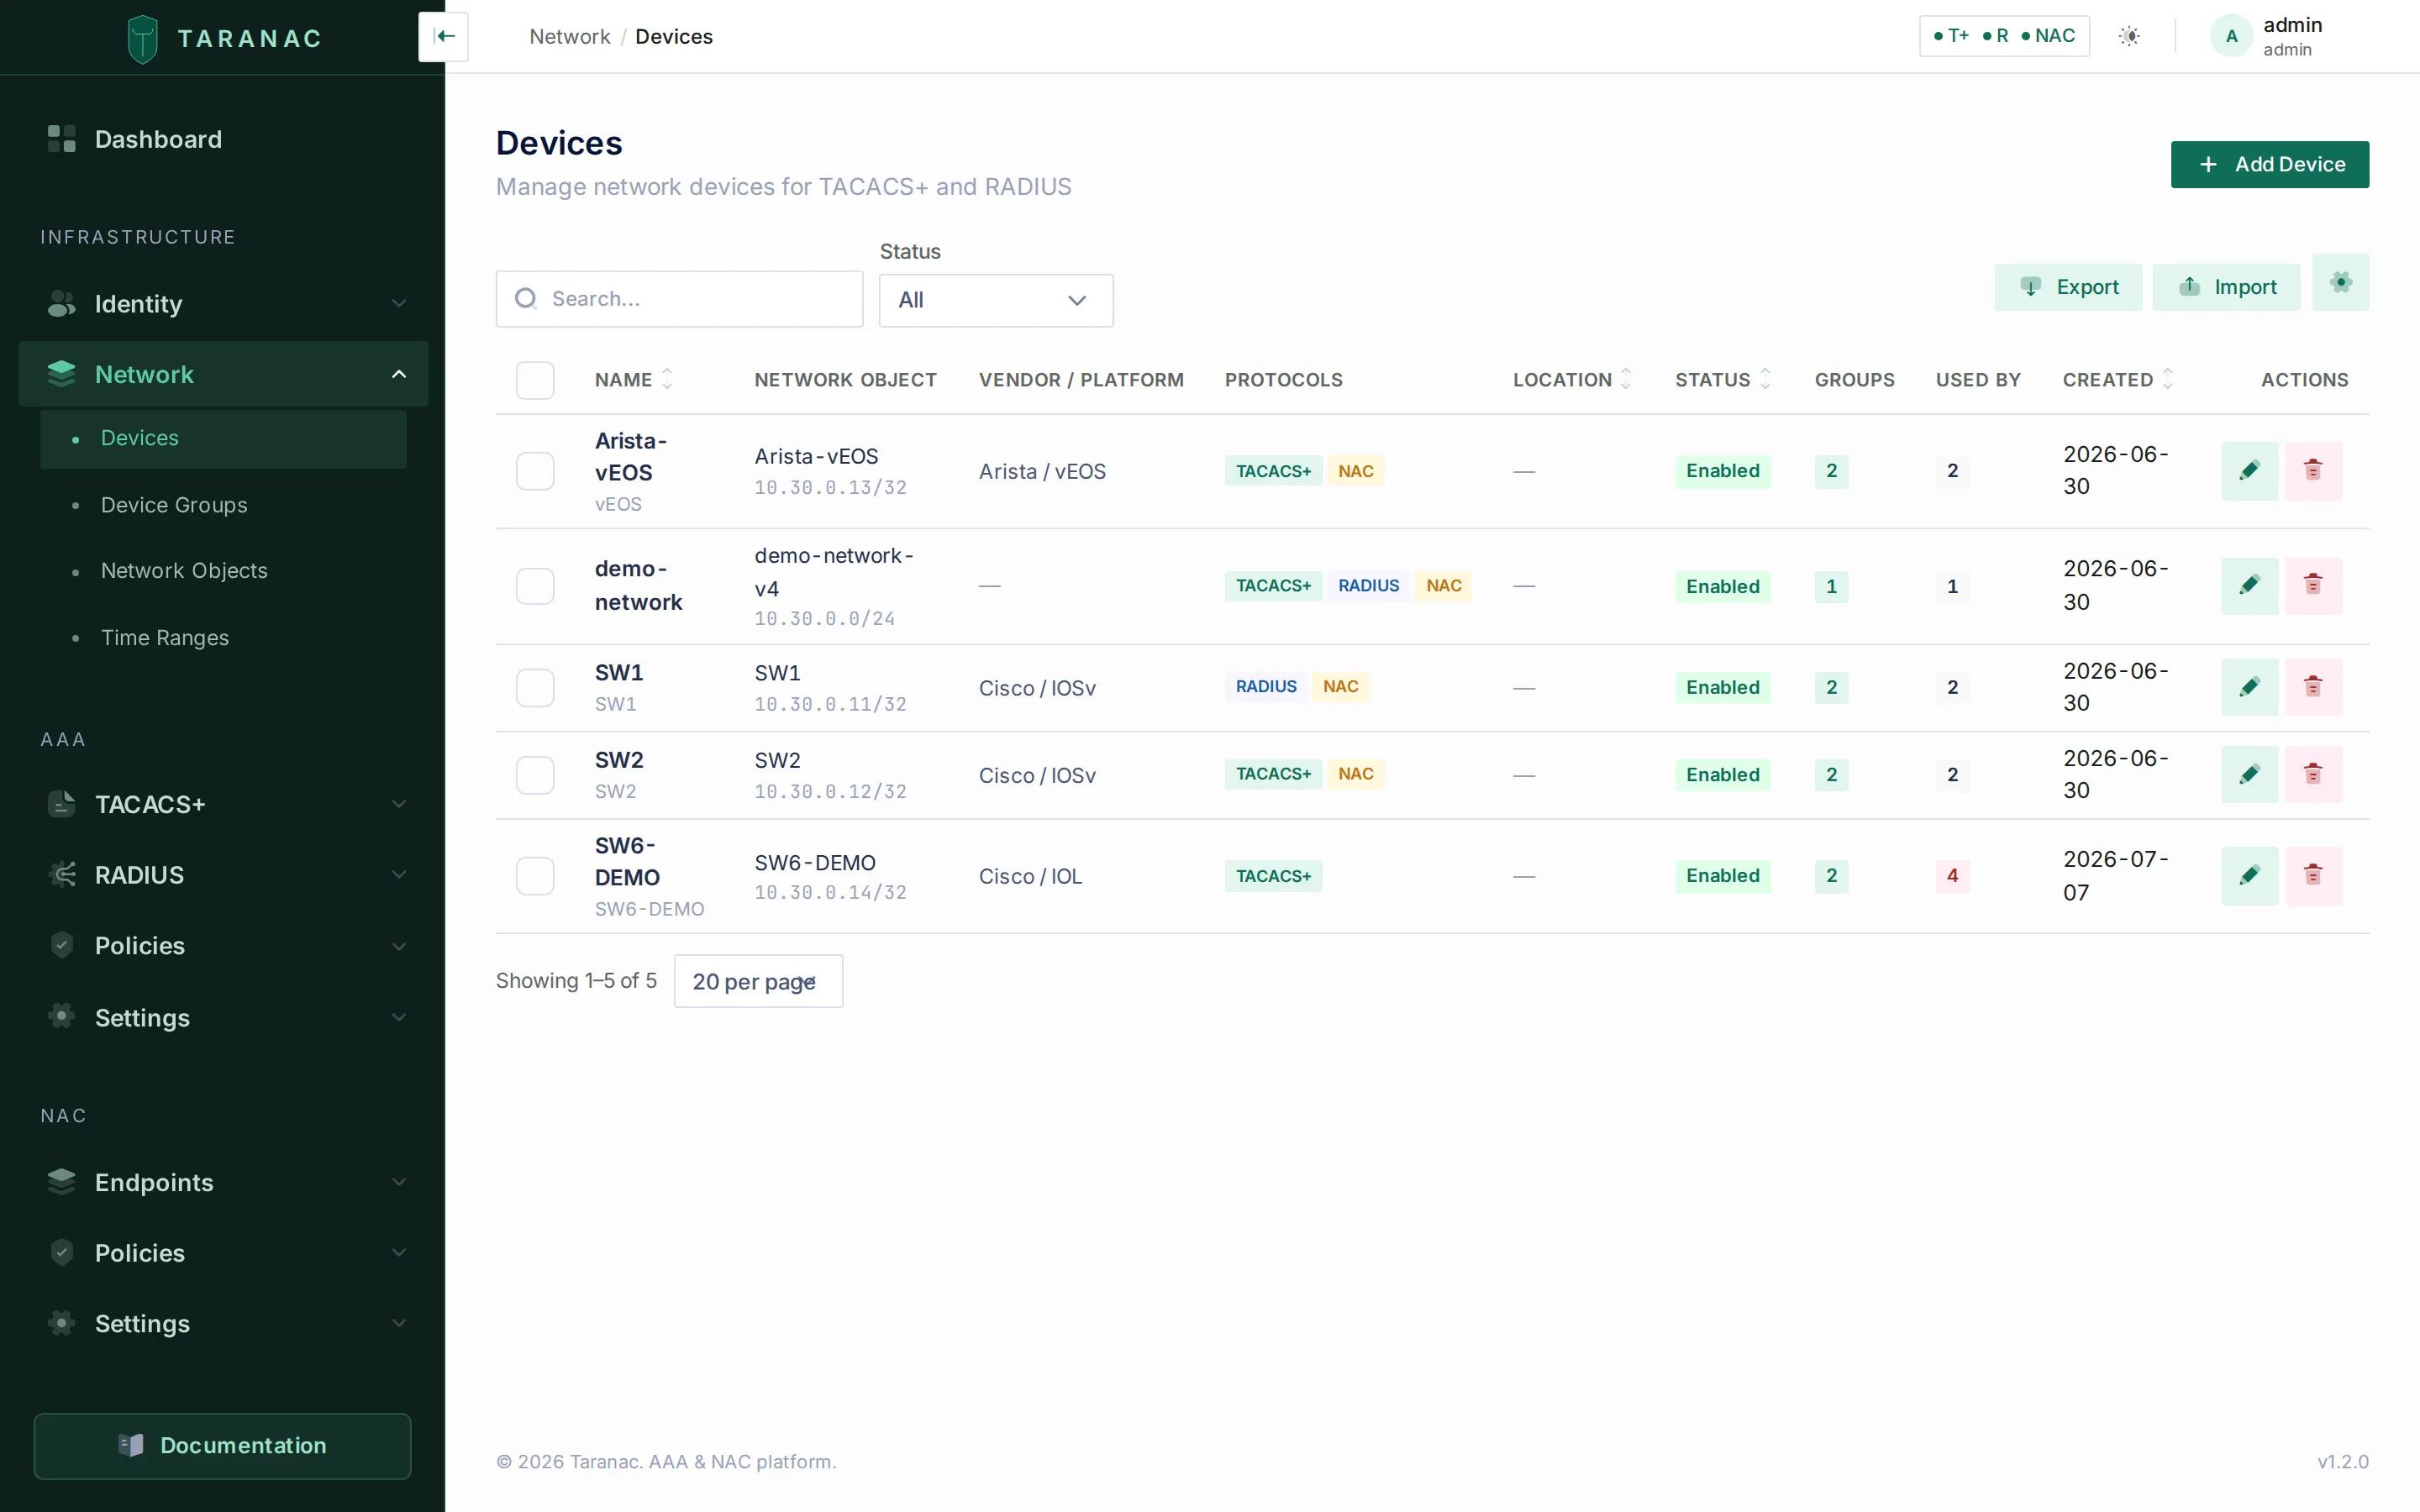 Infrastructure → Network → Devices: the device inventory with protocol badges, group membership and status.
Go to Infrastructure → Network → Devices (/network/devices), press Add Device, and fill the form. It is split into identity on the left and protocols/secrets on the right.
Left column — identity:
| Field | Required | Example |
|---|---|---|
| Name | Yes | core-sw-01 |
| Hostname | No | FQDN or IP, for display only |
| Network Object | Yes | the device’s IP / NAS address — picked from the Network Objects list (range and FQDN objects are not selectable here; you can create the object inline) |
| Device Groups | No | the groups this device belongs to — a device may be in several |
| Description / Notes / Tags | No | free text; tags are comma-separated |
| Vendor / Platform | No | Cisco / IOS-XE |
| Location | No | DC-East Rack 14 |
| Enabled | — | on by default; a disabled device is excluded from all AAA/NAC processing and no config is generated for it |
Group membership is editable from this form as well as from the group’s own members panel — you do not have to open the device group to add a device to it.
Right column — protocol support. Three toggles (TACACS+, RADIUS, NAC) are all on for a new device and decide which secret fields appear:
- TACACS+ → a TACACS+ Key field plus a Single Connection toggle (reuse one TCP session for all requests from this device).
- RADIUS or NAC → a RADIUS Secret field (NAC rides on RADIUS).
- NAC → a CoA block: CoA Secret, CoA Port (typically
3799per RFC 5176, or1700on legacy Cisco), and an optional Vendor Dictionary selector that pins how CoA actions are encoded for this device. - TACACS+ also carries a collapsed Login Banners block — a per-device Welcome Banner and MOTD Banner. Leave both empty and the device inherits them, from a device group first and then the global TACACS+ setting. Banners are set here and at group/global scope, not on a TACACS+ profile.
For each secret field you can type a value, click the eye icon to reveal a stored one, or use the key icon to generate a strong secret.
Press Create Device. The device count on the dashboard’s Infrastructure widget ticks up on its next refresh.
5. Authorize one login
Section titled “5. Authorize one login”You now have a device, but the only policy rule is the deny-all default — a real login would be rejected. Give yourself exactly one permit path.
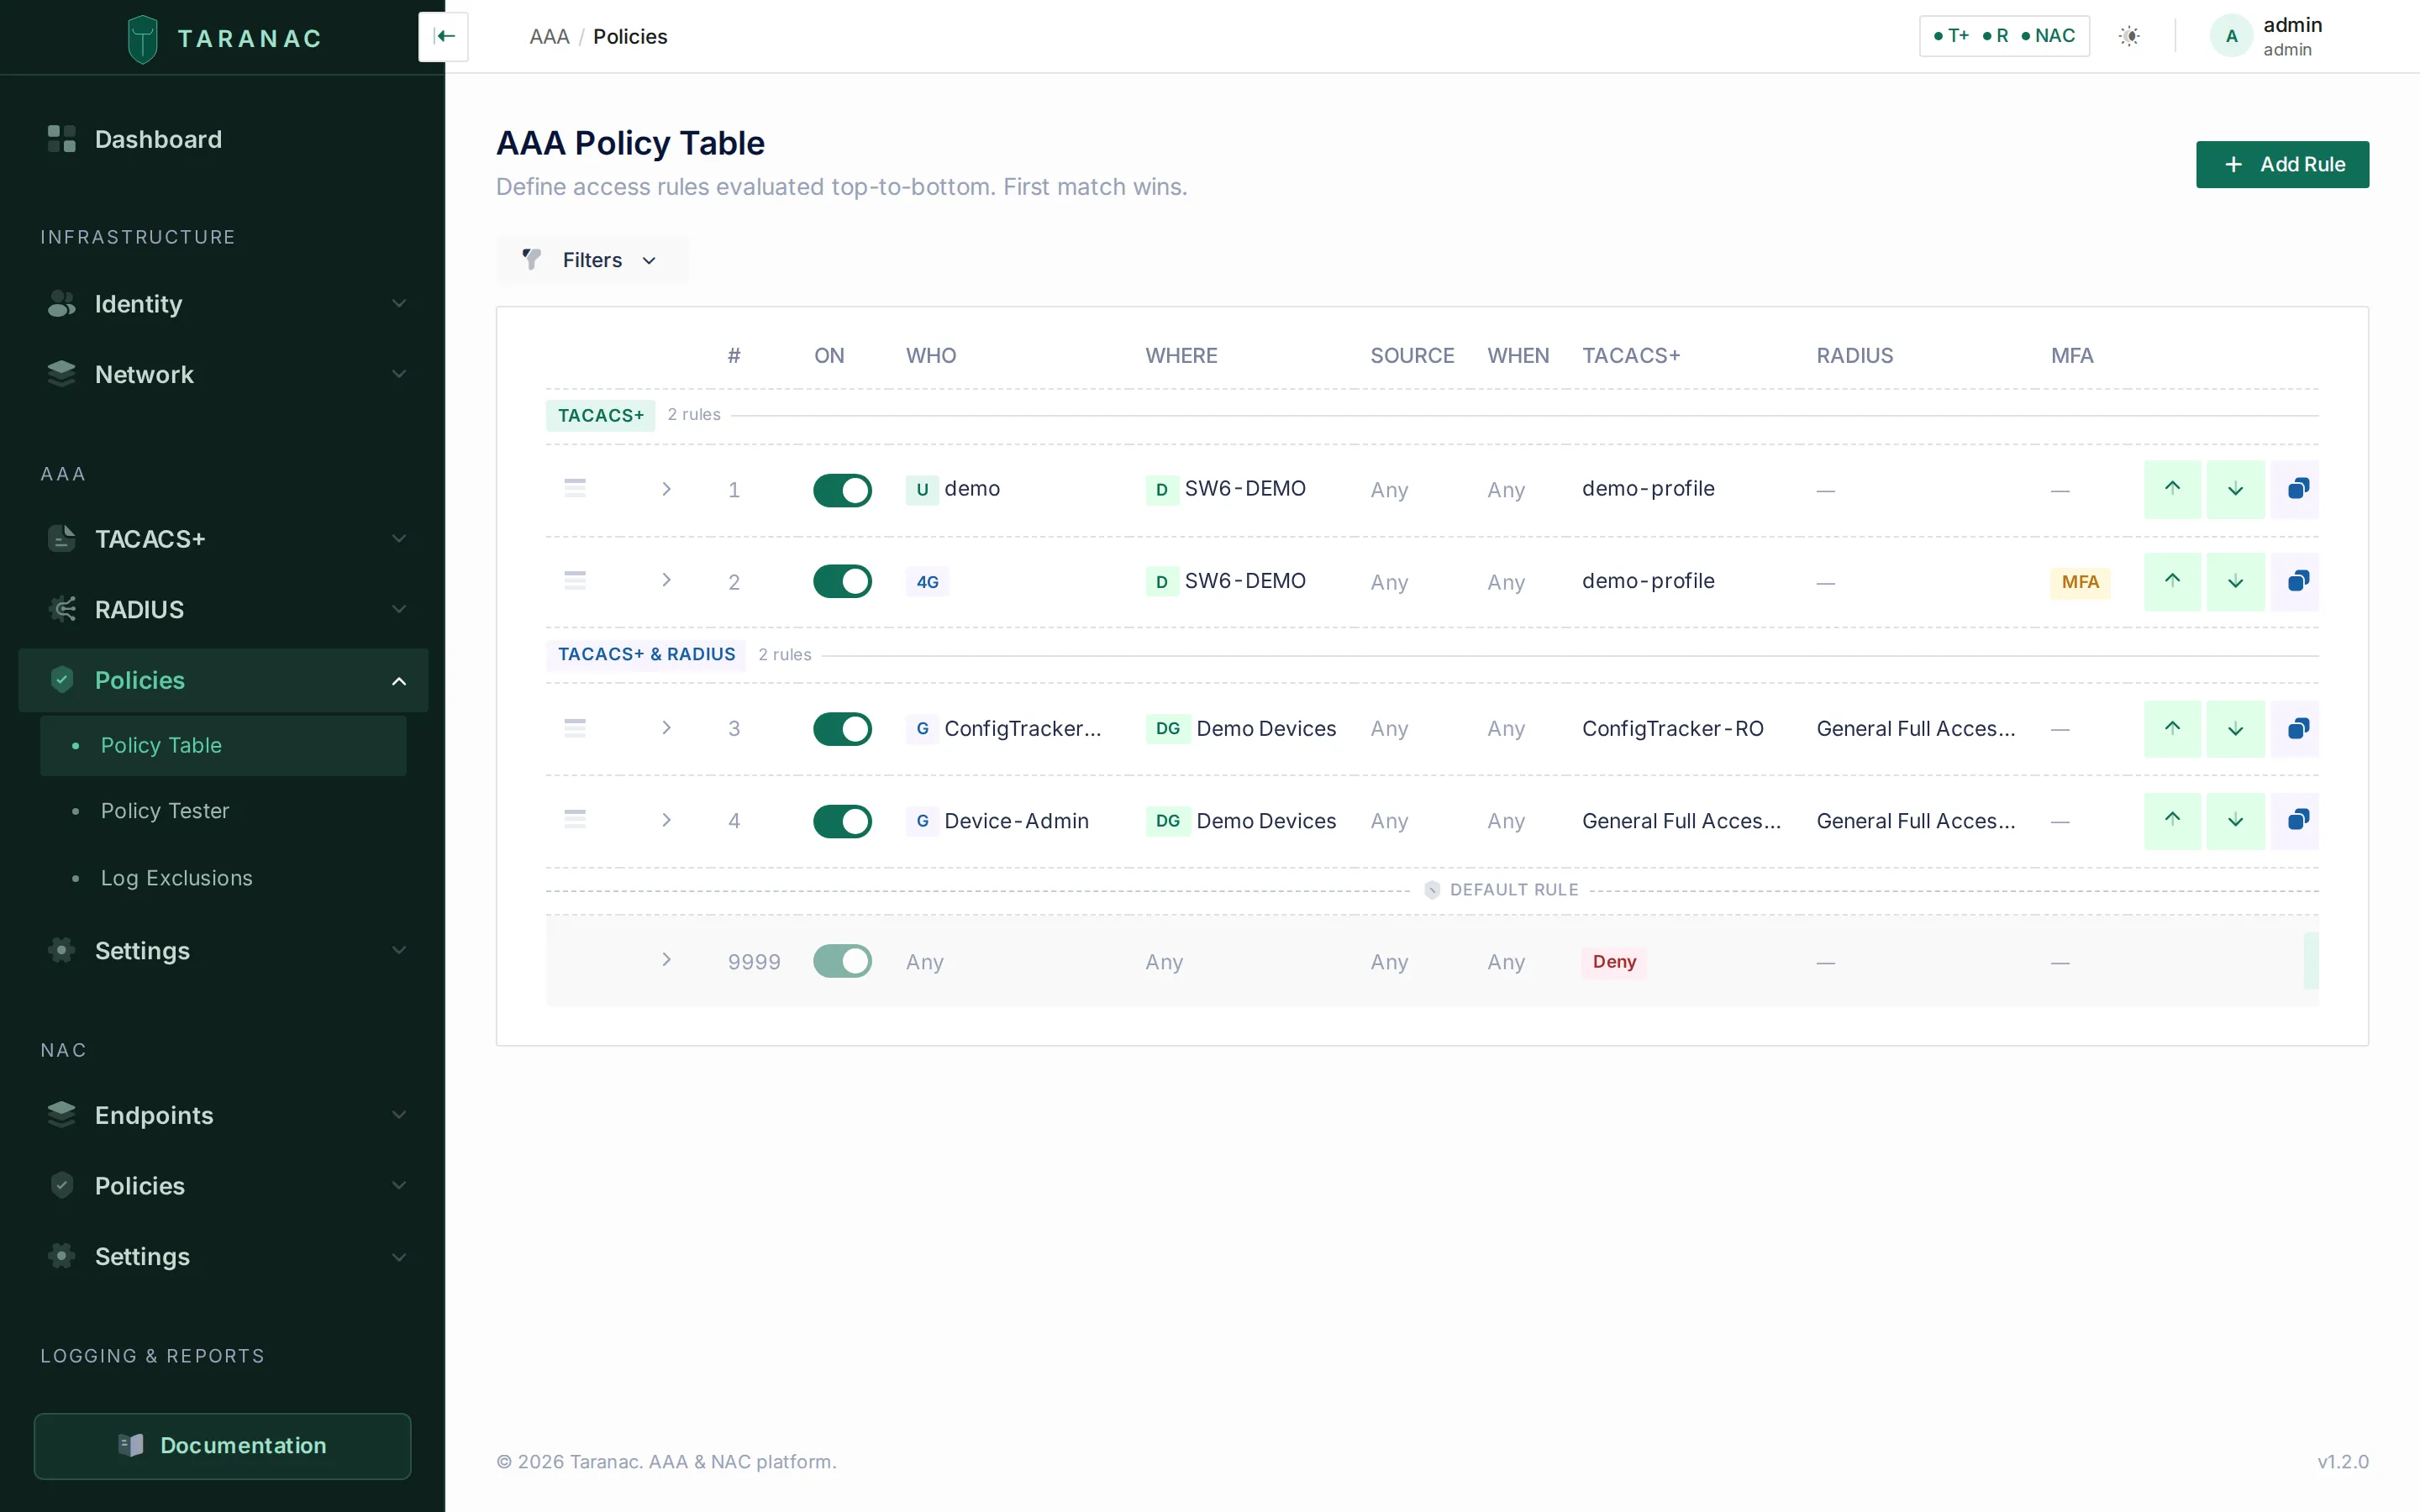 AAA → Policies → Policy Table: the ordered rule table, evaluated top-down, first match wins, with the deny-all default pinned at the bottom.
Open AAA → Policies → Policy Table (/aaa/policies) and press Add Rule. A new rule is always created above the default, which stays at order 9999 and can be edited but never deleted or moved. Fill in:
| Section | What to set |
|---|---|
| General | A description — it becomes the rule’s label in the tac_plus-ng and RADIUS auth logs, so make it readable. Enabled is on by default. |
| Who | Your admin account, or its Administrators group. A rule matches if the user is listed directly or belongs to a selected group. |
| Where | The device you just created (or a device group containing it). |
| Source | Leave Any source. Console only is TACACS+ only — a RADIUS action on a source-restricted rule never matches a real login. |
| When & MFA | Leave the schedule at Always and MFA off for now. |
| Protocol Actions | Set TACACS+ mode to Profile and pick the seeded General Full Access (priv 15). Set RADIUS to None unless you also administer this device over RADIUS. |
Press Create Rule. Nothing else is needed for the shell to work: a TACACS+ profile’s command default is permit — on the seeded profiles and on any new profile you create — so commands are allowed unless a command set says otherwise. Attach the seeded read-only command set later, when you want to restrict what may be typed.
6. Run a first authentication
Section titled “6. Run a first authentication”Two ways to validate, from safest to live:
-
Policy tester (no live traffic). Open AAA → Policies → Policy Tester (
/aaa/policies/tester). Choose the protocol (TACACS+ or RADIUS), enter the username — it must be a user that exists, or the tester answers User not found — the NAS IP of the device you just created, optionally a source IP, and for TACACS+ the access type (remote or console). You can also simulate a time. Taranac evaluates the real rule table and answers with Rule #N matched or No rule matched, the resolved context, and exactly what the match returns. The tester never touches the daemon. -
Live request from the device. Configure the network device’s AAA settings to point at Taranac’s TACACS+ port (
49, or6049for TACACS+ over TLS, which is enabled by default) or the RADIUS auth port (1812) with the matching shared secret, then attempt a login. See Device configuration for the vendor CLI side. Whatever the outcome, it is recorded.
Check the result under Logging & Reports → AAA Logs → Authentication Log (/logging/aaa/authentication):
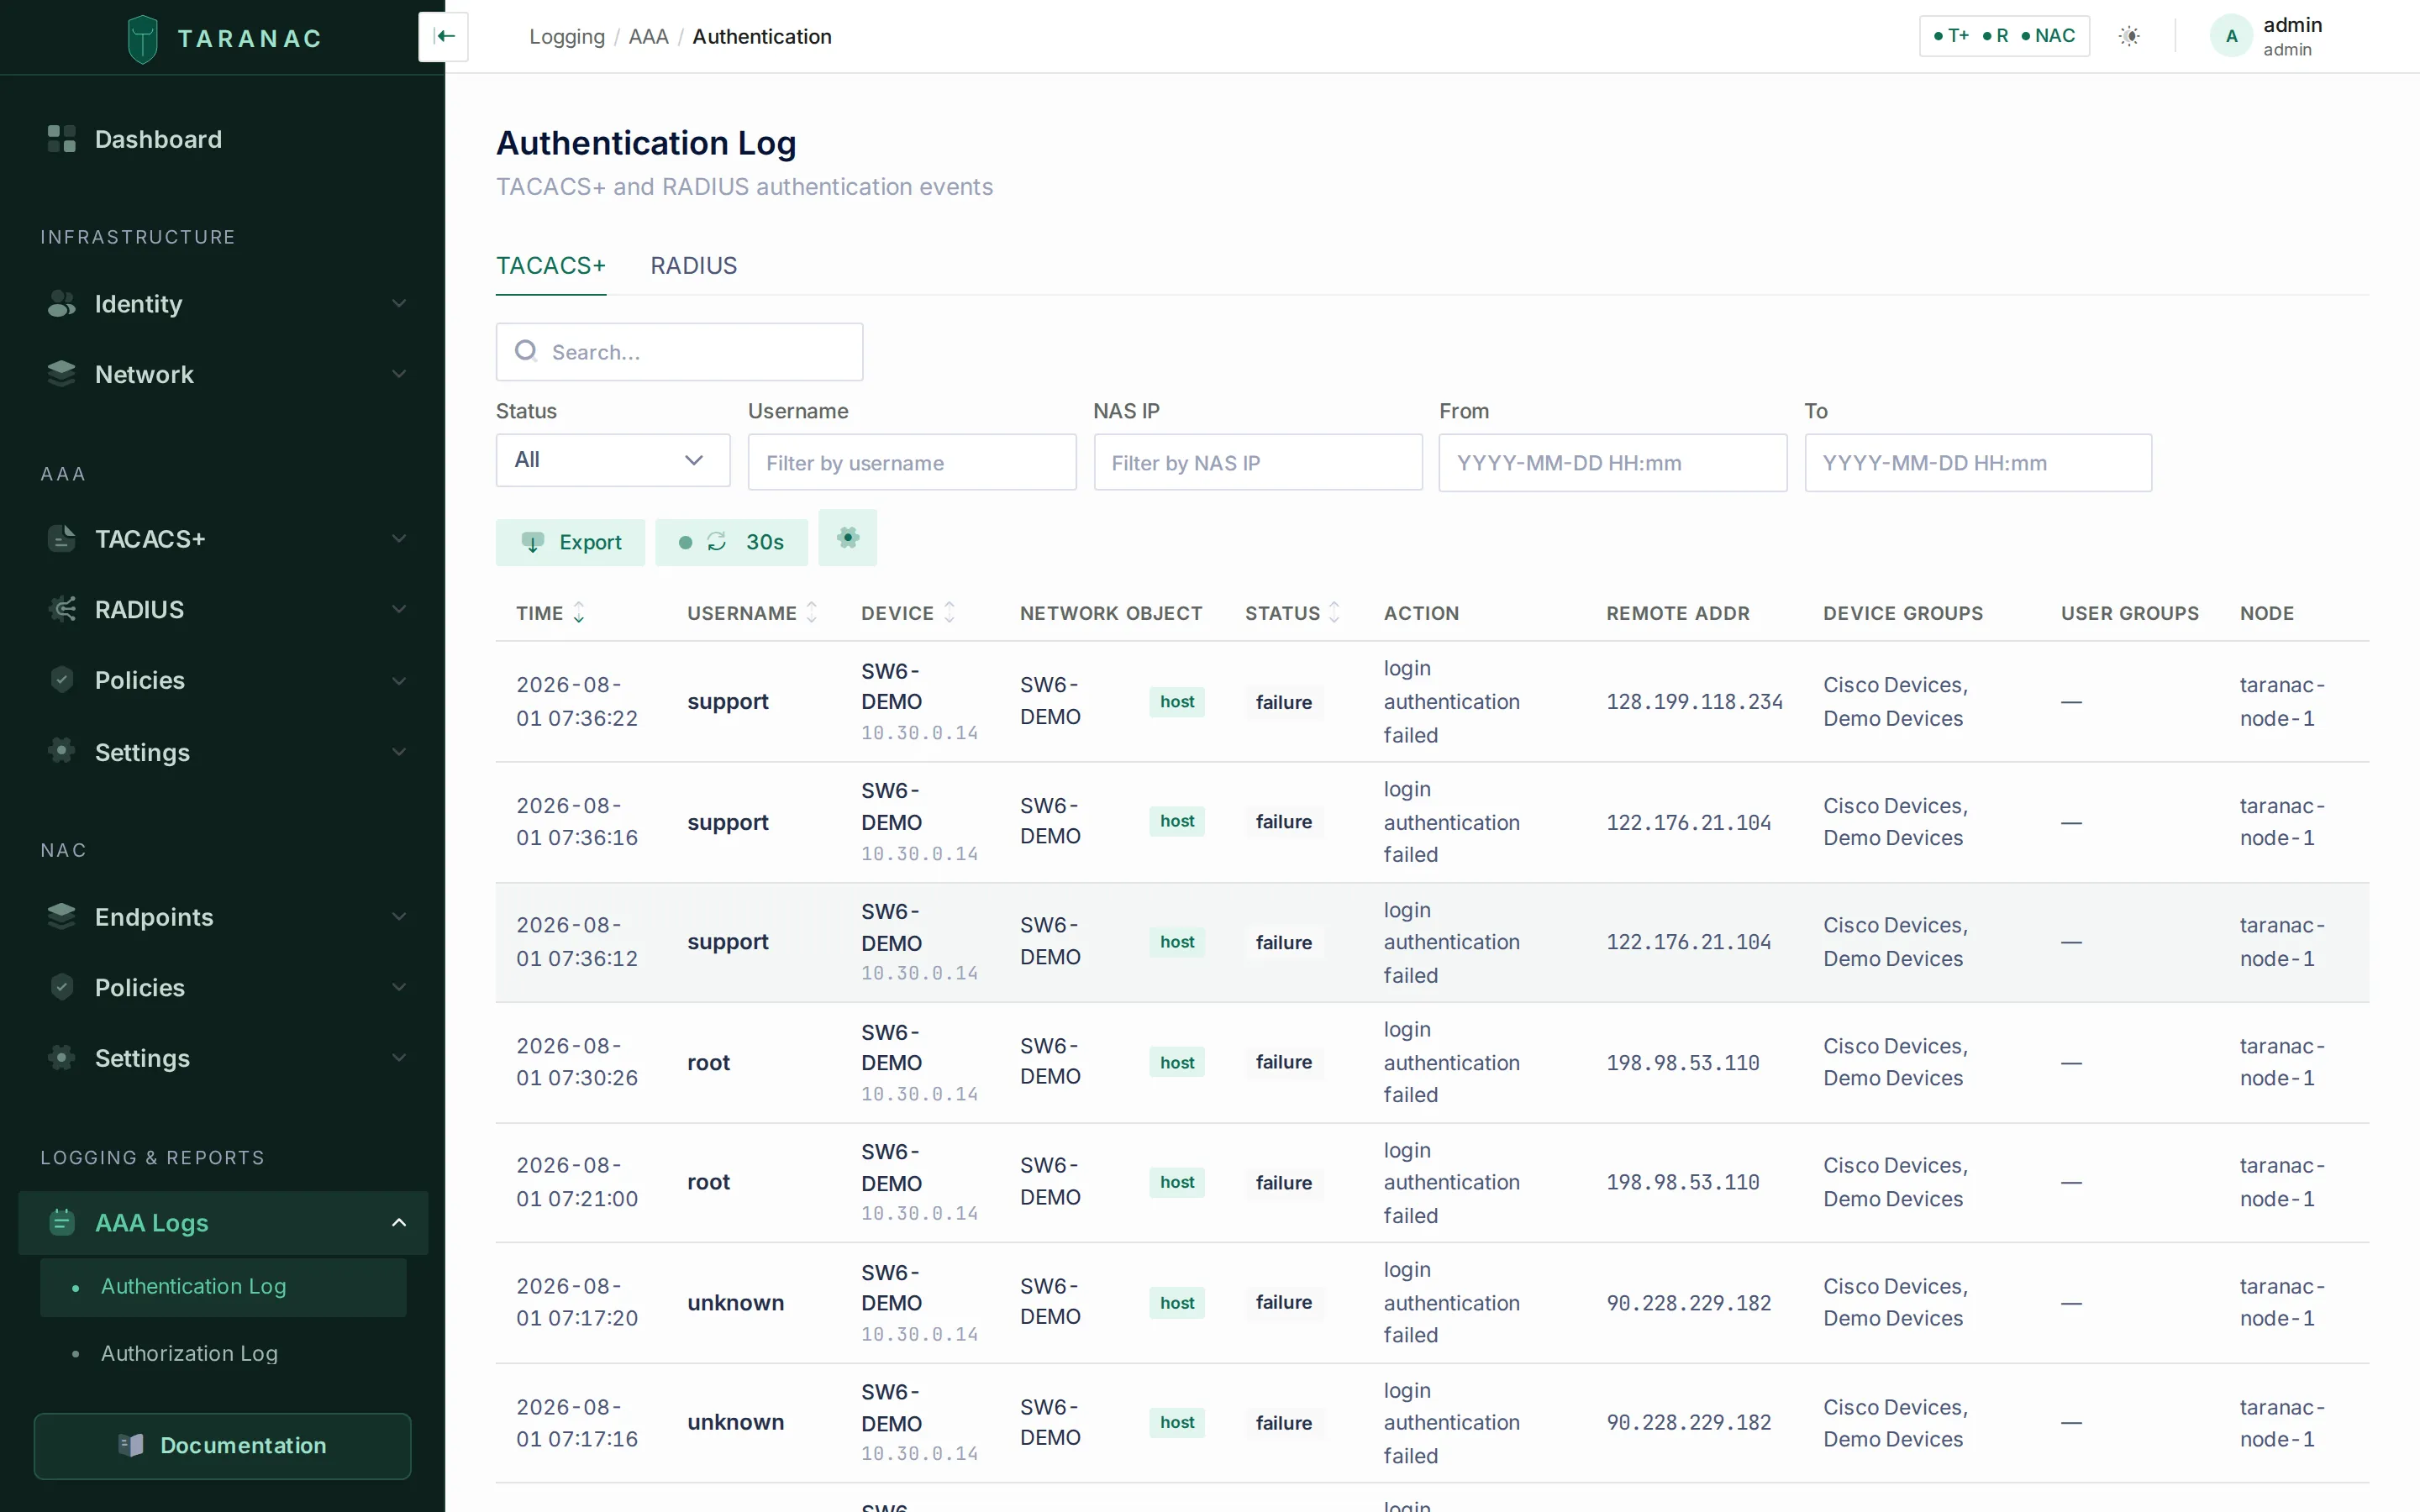 The authentication log, with separate TACACS+ and RADIUS tabs: every accept and reject with the user, device, network object, remote address, action and node.
A rejected attempt also surfaces in the dashboard’s Top failed auth (24h) widget. If you see your attempt land — accepted or rejected — the request path is wired correctly end to end.
When to use what
Section titled “When to use what”| You want to… | Use | Why |
|---|---|---|
| Confirm a rule before going live | AAA → Policies → Policy Tester | Evaluates the real policy table with no traffic and no risk. |
| Prove the daemon receives traffic | A live request from the device | The tester never touches the daemon; only a real packet does. |
| Diagnose a rejection | Top failed auth (24h) widget + Authentication Log | The widget surfaces who is failing; the log gives the device, action and reason. |
| Push a saved change immediately | Reload on AAA → Settings → TACACS+ / RADIUS | Auto-reload runs every 30 s; Reload does it now, and previews and validates first. |
| Reuse one secret across many devices | Leave device secrets blank | Devices inherit from device group / global secret — change it in one place. |
| Override a single device | Set the secret on the device | Per-device secrets take precedence over inherited ones. |
| Change the banner a device shows at login | Device form → Login Banners, or the device group / global TACACS+ setting | Banners ride the authentication reply, so they are not a TACACS+ profile field. |
Related
Section titled “Related”- Installation — stand the platform up first.
- Architecture — how the eleven containers fit together, and which ports they listen on.
- Network devices — the full device model, groups, banners and shared-secret inheritance.
- AAA policy — building the rule table and using the tester.
- TACACS+ — templates, profiles, command sets and the command default.
- Device configuration — what to type on the switch so it talks to Taranac.
- Users & groups and RBAC — managing admins beyond the seeded account.
- Project repository — the deployment bundle and product documentation.